Updated:2025-03-13
Views:2737
 WeChat
 QQ
QQ
 Online Service
Measures all the critical laser beam parameters of the focused beam up to 9999 W power (up to 30 kW on request). Measured laser parameters include:
Fully automated operation
Trend analysis with good/bad signal
Detailed report with time stamp
Works with different types of welding heads without changes to the measurement system
Industrial interface of choice in addition to GigE: PROFINET, EtherNet/IP and CC-Link
Rugged for industrial production environment
Short measurement time for frequent measurements during shift operation
Two options for single-mode or multi-mode lasers available
Although ever more powerful cutting and welding laser equipment is being used on modern production lines, all too frequently – due either to lack of time or to the complexity – the quality of the laser beam goes unchecked during the production process. Because laser process quality is directly linked to laser quality, this can lead to large batches of defective parts in high-throughput production lines, e.g. in the automotive industry. In addition to the significantly higher risk of loss or safety issues, neglecting to monitor the quality of the laser beam consistently makes it almost impossible to detect the root cause of problems, when they occur.
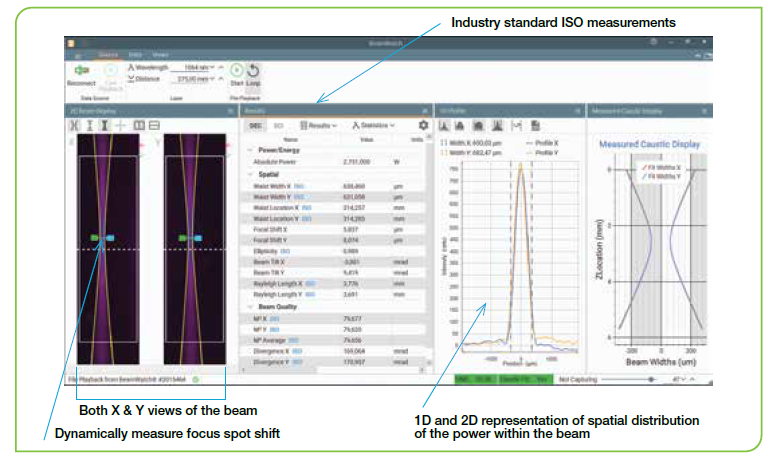
To address this issue, BeamWatch Integrated was developed. Based on the patented non-contact BeamWatch measurement principle (using Rayleigh scattering), this technology provides for the simultaneous measurements of multiple profiles along the beam caustic at video rates, delivering – in mere fractions of a second – all the beam key parameters according to ISO 13694 and ISO 11146 standards. Real-time performance also allows for detection of dynamic focal shift, while a NIST-traceable power sensor assures absolute power readings. With its shutter and rugged design, BeamWatch Integrated is a compact and self-contained system that can accommodate different types of welding heads. A variety of interfaces makes it possible to integrate the system into production networks and automated manufacturing lines to facilitate direct transfer of measurement data.
The short measurement times allow the laser beam to be checked automatically during the loading / unloading phase, as frequently as once every produced unit. Additionally, all parameters can be read out using standard interfaces and – as part of the process monitoring – consistently documented for each individual component, as desired. Since they are based on a large amount of measurement data, trend diagrams are highly accurate and can therefore deliver useful insights for predictive maintenance.
Tolerances and limit values can be set up for measured parameters to trigger corrective actions as needed. BeamWatch Integrated operates virtually without maintenance, because contactless measurement exerts no wear on the instrument.

| Wavelength | 980 - 1080 nm |
| Waist width accuracy | ±5 % |
| Waist location accuracy | ±125 µm within the BeamWatch window |
| Camera field of view inside the unit | 32.17 mm x 8.55 mm |
| Maximum entrance/exit beam diameter | 12.5 mm |
| Focal shift accuracy | ±50 µm |
| BPP accuracy | ±3.5 % RMS |
| Divergence accuracy | ±3.5 % RMS |
| M² accuracy | ±3.5 % RMS |
| Particulate purge | Clean dry gas (Air, Nitrogen, Argon), ~5-10 L/min, 6 bar |
| Power range | 500 W - 9999 W (up to 30 kW on request) | |
| Maximum power density at power meter(1) | Beam diameter | Max power density |
| < < 15 mm | 10 kW/cm² | |
| 15 - 20 mm | 7 kW/cm² | |
| 20 - 40 mm | 5 kW/cm² | |
| 40 - 45 mm | 4 kW/cm² | |
| Power sensor response time | 2.7 s max for 9999 W (quicker for less power) | |
| Backscattered power | < 1 % | |
| Power noise level | 25 W | |
| Linearity with power | ±2% | |
| Power accuracy | ±5% | |
| Power accuracy | ±5 % |
| BeamWatch Integrated software | |
| Output | OK/Warning/NOK values, CSV, PDF and BeamWatch files |
| Power Sensor | NIST traceable |
| Camera | Certification |
| Communication (addition to GigE) | PROFINET/以太网/IP/CC-Link |
| Distance between focus and power meter | 150-175 mm or 500 mm |
| Power supply | 24 Volts DC, 5 Amps max |
| Water cooling(2) | Clean non-corrosive water, 8 L/min, 18-30 °C, 6 bar, ~2 bar pressure drop |
| Weight | ~20 kg |
| Dimensions | 21.78 in x 12.48 in x 6.78 in / 21.78 in x 26.87 in x 6.78 in 553 mm x 317 mm x 172 mm / 553 mm x 682 mm x 172 mm |
| Compliance | CE, UKCA, China RoHS |
(1) For circular beam centered within ¼ of beam diameter. IMPROPERLY CENTERED BEAM CAN CAUSE DAMAGE TO SENSOR. Maximum tilt angle on power sensor ±5 degrees. For rectangular beam please consult MKS Ophir representative
(2) Water temperature rate of change <1ºC/min. The recommended flow rate can be lowered proportionately at lower than full power but should not be below 3 liter/min. The response time will be optimum with the recommended flow rate.
Customer Service QQ
Customer Hotline:
Technical Supports