Updated:2025-03-13
Views:2143
 WeChat
 QQ
QQ
 Online Service
 Product Manual
  Datasheet
  Drawing
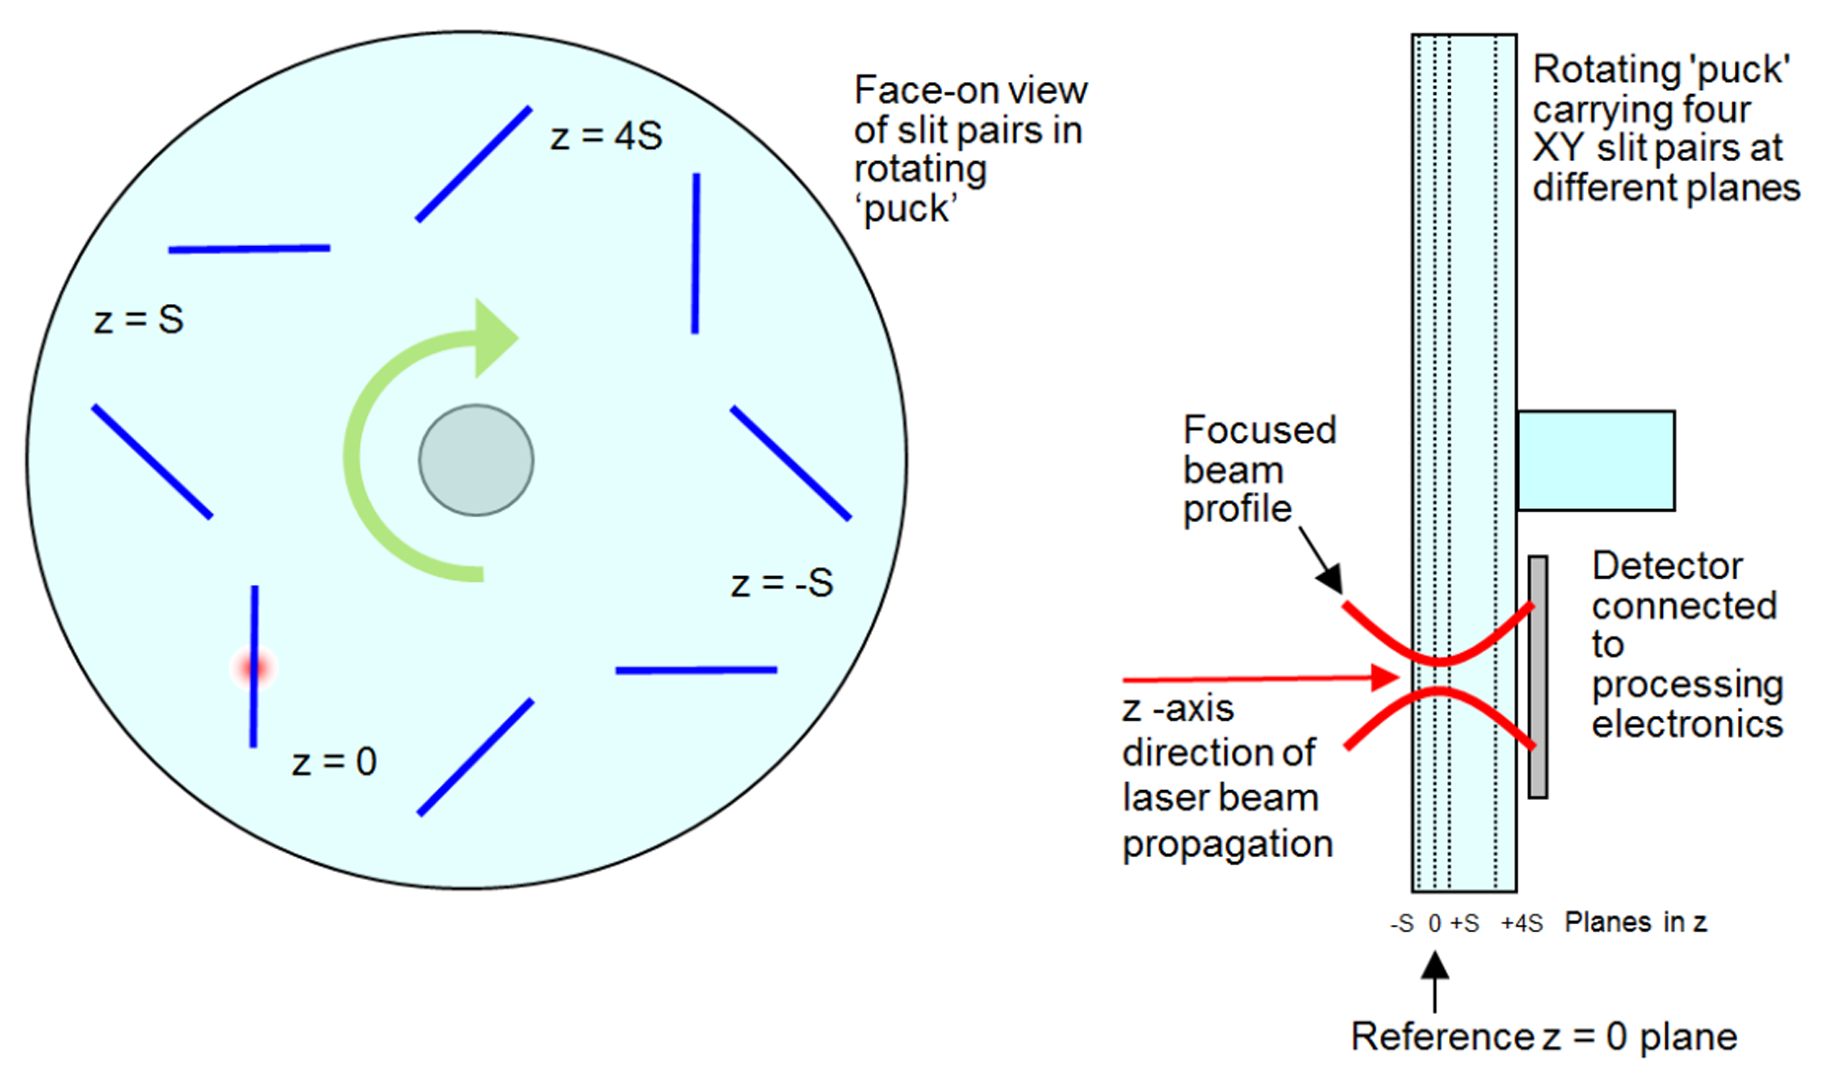
DataRay’s BeamMap2 represents a radically different approach to real-time beam profiling. It extends the Beam'R2’s measurement capabilities by allowing for measurements at multiple locations along the beam’s travel. This real-time scanning slit system uses XY slit pairs in multiple Z planes on a rotating puck to simultaneously measure four beam profiles at four different Z locations. The BeamMap2’s unique design is most advantageous for real-time measurement of focus position, M², beam divergence, and pointing.
Compared to the standard BeamMap2, the BeamMap2 Collimate is specially designed with a significantly increased plane spacing of 5 mm for use with well-collimated beams.

Key Features
Multiple detector options covering 190 to 2500 nm
190 to 1150 nm, Silicon detector
650 to 1800 nm, InGaAs detector
1800 to 2300/2500 nm, InGaAs (extended) detector
ISO compliant beam diameter measurements
Port-powered USB 2.0
Auto-gain function
Optional stage accessory for ISO 11146- compliant M² measurements
True2D™ slits
Resolution to 0.1 µm
5 Hz update rate (adjustable 2 to 10 Hz)
Profile CW/Quasi-CW beams
Beam diameters 5 µm to 4 mm
Multiple z-plane scanning
XYZ profiles, plus θ-Φ
Focus position and diameter
Real-time M², pointing, and divergence measurements
Identify focus with ±1 µm repeatability (beam dependent)
Example Applications
Very small laser beam profiling
Optical assembly and instrument alignment
OEM integration
Lens focal length testing
Real-time diagnosis of focusing and alignment errors
Real-time setting of multiple assemblies to the same focus
M² measurement with available M2DU stage
True2D™ Slits
0.4 µm thick metallic multilayer films on a sapphire substrate
Mutliple advantages over air slits
Avoid tunnel effect
Air slits are typically deeper than they are wide, and can buckle under high irradiance

Specification
| Wavelength |
Si detector: 190 to 1150 nm InGaAs detector: 650 to 1800 nm Si + InGaAs detectors: 190 to 1800 nm Si + InGaAs (extended) detectors: 190 to 2300 or 2500 nm |
| Scanned Beam Diameters |
Si detector: 5 µm to 4 mm InGaAs detector: 10 µm to 3 mm InGaAs (extended) detector: 10 µm to 2 mm |
| Plane Spacing | 5 mm: -5, 0, +5, +20 mm |
| Beam Waist Diameter Measurement |
Second moment (4s) diameter to ISO 11146; Fitted Gaussian & TopHat 1/e² (13.5%) width User selectable % of peak |
| Beam Waist Position Measurement | ± 20 µm best in X, Y, and Z — contact DataRay for recommendation |
| Measured Sources | CW, Quasi-CW beams |
| Resolution Accuracy |
0.1 µm or 0.05% of scan range ± < 2% ± = 0.5 µm |
| M² Measurement | 1 to > 20, ± 5% |
| Divergence/Collimation, Pointing | 1 mrad best — contact DataRay for recommendation |
| Maximum Power & Irradiance | 1 W Total & 0.5 mW/µm² |
| Gain Range | 1‚000:1 Switched; 4‚096:1 ADC range |
| Displayed Graphics | X-Y Position & Profiles‚ Zoom x1 to x16 |
| Update Rate | ~5 Hz, adustable 2 to 10 Hz |
| Pass/Fail Display | On-screen selectable Pass/Fail colors. Ideal for QA & Production. |
| Averaging | User selectable running average (1 to 8 samples) |
| Statistics |
Min.‚ Max.‚ Mean‚ Standard Deviation Log data over extended periods |
| XY Profile & Centroid | Beam Wander display and logging |
| Minimum Requirements | Windows 10 64-bit |
Customer Service QQ
Customer Hotline:
Technical Supports